
Pain: I hate getting returns from bad edgeband.
Agitate: Bad batches cost time and money.
Solve: I use a simple checklist before every bulk order.
Quick answer: To evaluate PVC edgeband before buying in bulk, check material composition and primer, measure thickness/width/straightness tolerances, test color (ΔE), gloss, surface texture, and adhesion (peel) strength. Use samples and basic lab tests or ask supplier TDS.
Before we dive in, I’ll show you a step-by-step way to reduce risk. Read on to learn exactly what I test, how I test it, and what tolerances I accept.
Key Quality Indicators Every Buyer Should Check Before Ordering PVC Edgeband?
I worry when spec sheets are vague. I want clear numbers before I buy.
Answer: The key indicators are material composition, back primer quality, color match (ΔE), gloss level, thickness and width tolerances, straightness, surface defects, and peel/adhesion strength. Ask for technical data sheets and sample test results.

Dive deeper: what each indicator really means (and what I check)
I break the indicators into three groups: appearance, dimensions, and performance.
Appearance checks (why they matter)
- Color match (ΔE): I measure color difference against the panel sample. For high-end furniture I aim for ΔE ≤ 1.5–2.0; for general commercial use ΔE ≤ 2.5 is acceptable. A spectrophotometer gives repeatable results.
- Gloss level: I read gloss units (GU) at 60°; extreme gloss uses 20°. The gloss value must match the panel spec to avoid visible mismatch.
- Surface finish: Inspect for scratches, specks, orange peel, or inconsistent matt/shine across the roll.
Dimensional checks (practical tolerances)
- Thickness and width: I specify tolerance up front (for example thickness ±0.05 mm; width ±0.4–0.5 mm). Roll lengths and standard thicknesses are often listed in TDS.
- Straightness: I roll out 2 meters and check curvature. Acceptable curvature depends on thickness; industry guidance shows specific max deviations per thickness class.
Performance checks (longevity and bonding)
- Back primer presence: I verify that the back is fully coated with primer for reliable adhesive bonding.
- Peel/adhesion strength: I run a peel test or ask for lab data. Peel strength is sensitive to glue temp, adhesive amount, and feed rate. I want data showing stable peel at expected processing conditions.
| Indicator | What I measure | Typical target |
|---|---|---|
| Color (ΔE) | Spectrophotometer | ≤1.5–2.5 (depending on grade) |
| Gloss (GU) | Gloss meter (60° or 20°) | Match panel spec |
| Thickness | Micrometer | ±0.05 mm (specify) |
| Width | Caliper | ±0.4–0.5 mm |
| Straightness | 2 m flat roll test | See supplier TDS tolerances. |
| Peel strength | 90°/180° peel test | Supplier lab data / process-specific |
I always ask the supplier for TDS and sample lab reports. If they cannot provide these, I treat that as a red flag.
How to Verify Material Composition and Surface Performance?
I once accepted a low-cost roll. It looked fine, but it cracked during processing. Now I always verify composition.
Answer: Ask for a technical data sheet that lists PVC resin content, fillers (e.g., CaCO₃), stabilizers, and primer system. Request a back-coating inspection and small thermal or solvent tests if you need to confirm performance.
Dive deeper: steps I take to confirm composition and surface quality
Step 1 — Request the TDS and raw-material list
I review the supplier TDS for: PVC resin type, percentage of calcium carbonate filler, stabilizer system (e.g., Ca-Zn), and any acrylic modifiers. These affect flexibility, processing, and heat resistance. A clear TDS often lists these ingredients.
Step 2 — Visual and simple lab checks
- Back primer check: I visually inspect the roll back and run a quick tape test to see if the primer bonds. A fully covered primer helps consistent hot-melt bonding.
- Softening point / heat behavior: I warm a small sample to expected processing temperature to check for shrinkage or deformation. PVC should remain stable within recommended range (check TDS for max continuous exposure).
Step 3 — Advanced checks (when needed)
- FTIR or lab analysis: For repeated large orders, I send samples to a lab to confirm polymer type and filler content.
- Solvent resistance / scratch resistance: I perform a simple solvent wipe and a scratch test for baseline performance. Standards and test methods vary; request the supplier’s test method to compare apples-to-apples.
I accept only suppliers who can document raw materials and show consistent surface treatment. If I see hidden defects or inconsistent primer, I stop the order.
Essential Tests to Evaluate Color Accuracy, Gloss Level, and Texture Matching?
I have lost clients because the color was off. Small ΔE shows up on a 2m cabinet run. I now make color testing mandatory.
Answer: Use a spectrophotometer for ΔE, a gloss meter (60° or 20°) for gloss units, and tactile comparison or profilometer for texture. Require supplier measurements and confirm with your own lab or in-house device on samples.
Dive deeper: how I run each test and what I accept
Color (ΔE) testing
- Procedure: I match edgeband against the production panel. I measure using a spectrophotometer under the same geometry and illuminant. I prefer suppliers to use d/8 or d:8 geometry for consistency.
- Acceptance: For premium lines I require ΔE ≤ 1.5 across multiple samples. For standard projects ΔE ≤ 2.5 is acceptable.
Gloss measurement
- Procedure: I measure at 60°. If gloss is very high (>85 GU), I use 20°. I record initial gloss and compare after abrasion or aging if durability is a concern.
- Acceptance: Gloss must match the panel spec within a narrow GU range that we predefine.
Texture and feel
- Procedure: I run a tactile check. For critical projects I use a profilometer to measure surface roughness (Ra). I also compare the texture visually under standard lighting.
- Why: Texture differences are visible even when ΔE and gloss match. A slight change in micro-structure changes perceived color and reflectance.
| Test | Tool | My acceptance |
|---|---|---|
| Color (ΔE) | Spectrophotometer | ≤1.5–2.5 |
| Gloss (GU) | Gloss meter (60°/20°) | Match spec |
| Texture | Profilometer / tactile | Match sample visually and by Ra if needed |
I always keep a record of sample readings. That makes future batches easier to check.
Inspecting Dimensional Accuracy: Thickness, Width, and Straightness?
I once got a roll that varied in thickness. The trimming knives did not cope. I learned to check dimensions myself.
Answer: Measure at multiple points along the roll for thickness and width. Use a micrometer and caliper. For straightness roll out a measured length and check deviation; use supplier straightness tolerances from technical data.
Dive deeper: practical measurement routine I use
Thickness and width routine
- Sampling plan: I cut samples from the start, middle, and end of the roll and measure at 10–12 points across length. I use a calibrated micrometer for thickness and a caliper for width.
- Tolerance setting: I negotiate tolerance in the PO. Standard practice is ±0.05 mm for thickness and ±0.4–0.5 mm for width, but adjust per product and machine capability.
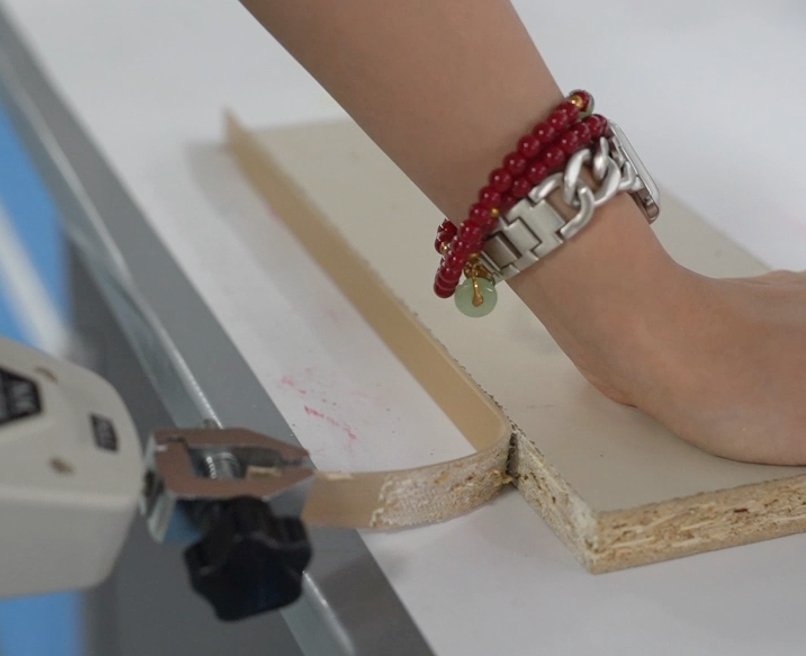
Straightness and curvature
- Method: I roll out 2 meters on a flat table and measure max deviation from straight line. Industry TDS lists acceptable curvature by thickness — thinner bands allow more deviation, thicker less. I use supplier limits as reference and reject rolls that exceed them.
Why strict dimensional control matters
- Dimensional variability causes feed problems, uneven trimming, and visible joints. I consider dimensional checks a must before large orders. I log every batch and compare with machine settings for continuous improvement.
Assessing Adhesion Strength, Durability, and Overall Production Consistency?
I once got a bulk order where edges peeled after humidity changes. That cost me a whole production run.
Answer: Require peel strength data under your processing conditions. Ask for process parameters (glue type, temperature, pressure). Run a peel test on samples and perform accelerated aging or humidity tests if the application demands it.
Dive deeper: how I verify bonding and long-term durability
Peel and bond testing
- Why: Adhesion depends on primer, adhesive, temperature, and pressure. Research shows glue temperature and dosage strongly affect peel strength. I insist on peel data at the adhesive and press settings my factory uses.
- Procedure: I either perform a 90°/180° peel test or have the supplier provide certified lab results. I compare peel values to baseline figures from prior successful batches.
Durability and aging
- Tests I run: humidity cycling, heat aging, and abrasion tests when needed. For outdoor or humid projects I demand relevant resistance tests. I also measure gloss retention after abrasion.
Production consistency
- Supplier audit: I check if the supplier has in-line QC and batch records. I request roll-to-roll consistency reports and initial sample tests from production lots. If production varies, I require tightened tolerances or a different supplier.
I only place large orders when peel and durability tests match my acceptance criteria and the supplier proves consistent production control.
Conclusion
I test samples, require clear specs, and only order when color, dimensions, and peel data meet my criteria.
Data sources and links
- Rehau — Edgeband Technical Data Sheet. https://www.rehau.com/downloads/886866/edgeband-technical-data-sheet.pdf (REHAU)
- ResearchGate — Influence of Temperature… on Peel Strength. https://www.researchgate.net/publication/321775411_Influence_of_Temperature_of_Applying_Glue_Glue_Dosage_and_Feed_Rate_on_Peel_Strength_of_Edge_Band_from_Curved_Edge_Part (ResearchGate)
- Cantisa — Technical Datasheet PVC Edgebanding. https://cantisa.es/wp-content/uploads/2017/07/hoja-t%C3%A9cnica-PVC_ingl%C3%A9s-1.pdf (Cantisa)
- Tece Dekor — Technical Specifications PVC Edgebanding. https://tece.com.tr/images/downloads/en/TDS_PVC.pdf (TECE | The Edgebanding Company)
- BYK Instruments — Gloss Measurement knowledge base. https://www.byk-instruments.com/en/t/knowledge/Gloss-Measurement (BYK Instruments)