
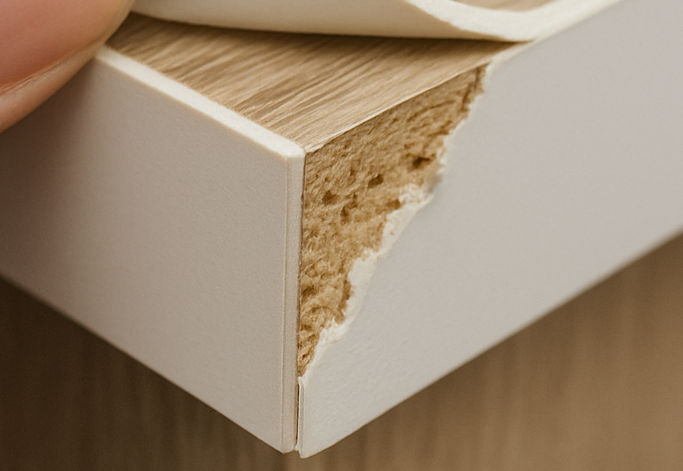
I watched finished panels fail at install because the edge came loose. I could have avoided that if we had controlled glue, primer, and heat. (PAS)
Perfect edge adhesion needs the right glue, the right primer, and tight temperature control. I explain how each factor works and what I do to get repeatable bonds.
Good adhesion starts on the production line. Read on and I will show the steps, checks, and tools I use to stop delamination and white lines.
Why Edge Adhesion Quality Matters More Than You Think?
A client returned a wardrobe set after six months because edges peeled at corners. I lost money and trust. (PAS)
Edge adhesion affects durability, water resistance, and perceived quality. A strong bond cuts claims, keeps schedules, and protects margins.
Dive deeper: commercial, functional, and warranty reasons to control adhesion
I treat adhesion as both a technical metric and a business KPI. Poor adhesion shows up as peeling, white lines, or full delamination. These failures create returns. They create extra shipping and rebuild costs. They also damage reputation.
From a functional view, the glue line must wet both the edge material and the board surface. Wetting means the molten adhesive spreads and fills tiny surface pores. If the adhesive does not wet, the bond is weak. I measure success by peel and shear tests, but I also watch field returns. Peel strength matters more for thin flexible edges. Shear strength matters for thicker edges or structural parts.
Different adhesives give different long-term properties. EVA hot-melts are economical and fast. PUR hot-melts (reactive polyurethanes) create chemical cross-links over days. Those cross-links improve moisture and heat resistance. I choose PUR for high-end or humid projects. I choose EVA where cost and speed are primary. I base selections on expected use and warranty targets. Henkel and other manufacturers publish performance profiles that I use when I specify glue types.
I also track three business KPIs: first-pass acceptance rate, claim frequency, and rework cost per order. When I tightened glue process controls, all three improved. The small investment in better glue and controls returned many times in saved claims and faster orders.
Understanding the Science of Glue Lines in Edge Banding?
I once saw glue smeared too thick and harden with gaps. The edge later popped. I then learned glue line science the hard way. (PAS)
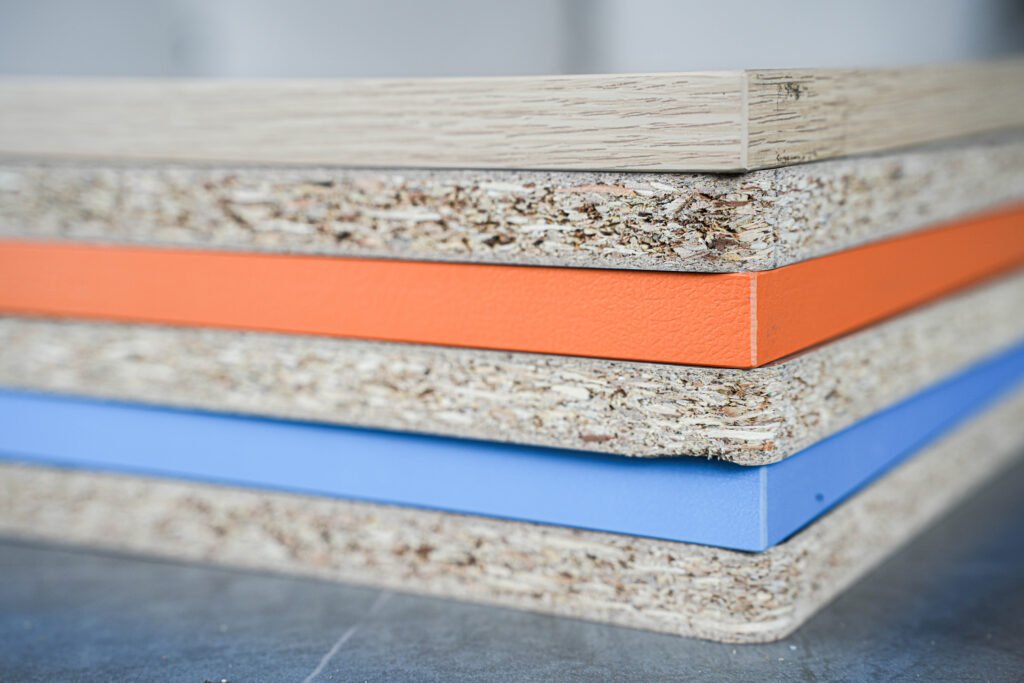
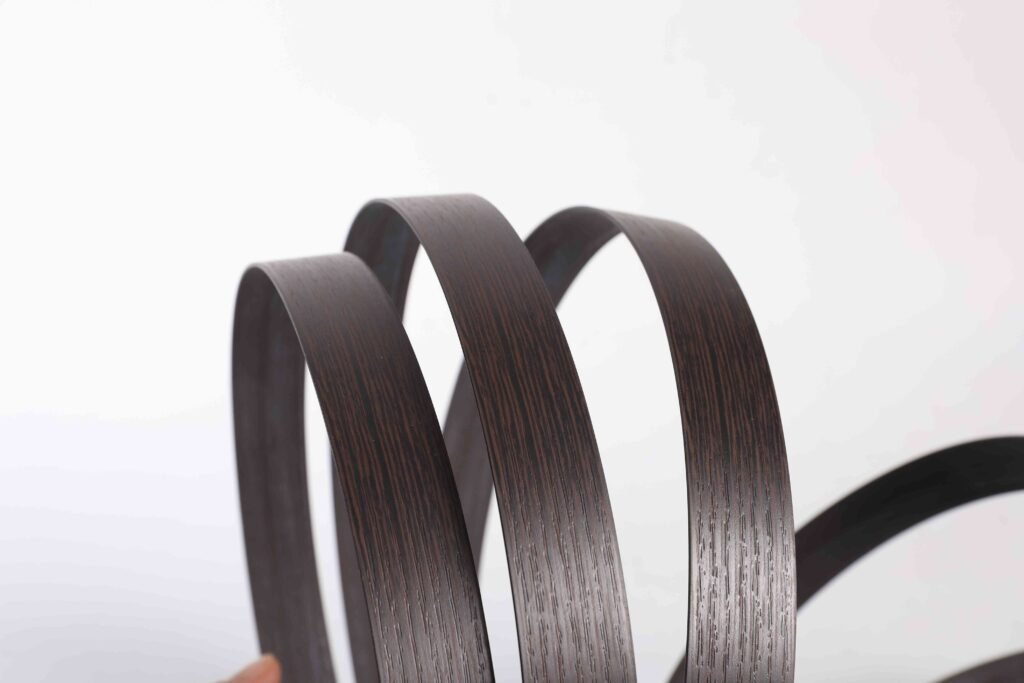
Glue lines are the thin films of adhesive between edge and panel. Their thickness, uniformity, and wetting determine bond strength and appearance.
Dive deeper: bond-line thickness, wetting, and the physics I watch on the line
What is a glue line?
A glue line is the adhesive layer after assembly and cooling. It includes the molten adhesive that flowed, any squeezed-out material, and any micro-voids that remain. The goal is full contact between materials with no gaps.
Thickness and strength
Research shows glue line thickness affects strength. Too thin can starve the joint and create weak spots. Too thick can trap uncured adhesive or create visible white lines. I aim for the lowest thickness that still ensures full wetting. Practical targets vary by adhesive type and edge material. For many hot-melt systems a target coating weight and a thin continuous film are ideal. Industry studies show bond performance changes when thickness varies beyond set limits. I follow supplier guidelines and measure outcomes with peel tests.
Wetting and surface energy
Wetting depends on surface energy. Plastics like PP and some coated boards have low surface energy and resist wetting. In those cases I use primers or special adhesives formulated for low-energy surfaces. I look at contact angle during trials. A low contact angle means good wetting. Good wetting correlates with higher peel strength.
Uniformity and process controls
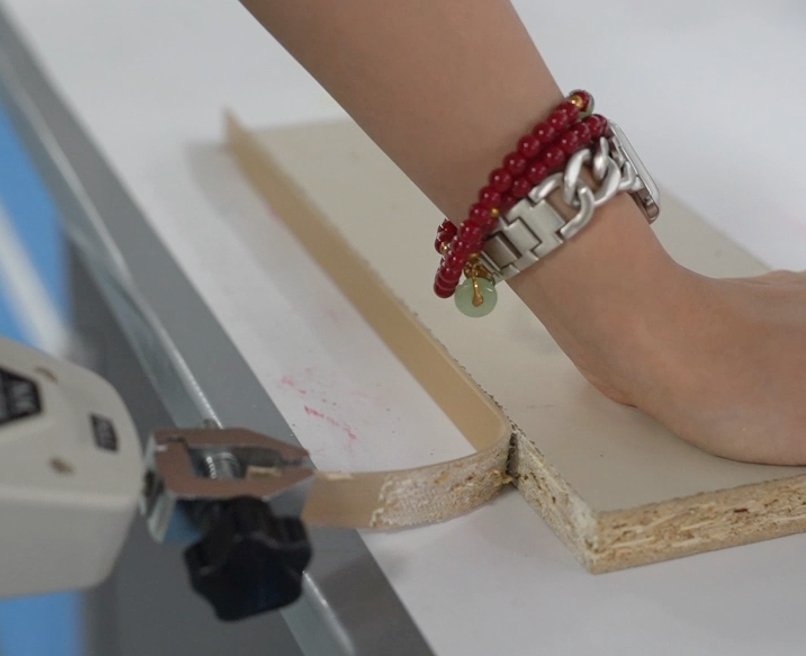
Glue application must be uniform across the entire length. I control roller temperature, melt pot temperature, application speed, and pressure. I check roller-gap and cleaning schedules. A good guide I use stresses “keep the glue hot” and check temperatures at the roller regularly to ensure consistent coating weight. Variations cause pockets, thin spots, or thick beads that later fail.
In short, glue line science is simple to state and hard to execute. I rely on measured coating weight, controlled temperatures, and lab peel tests to tune the process.
How Primers Enhance Adhesion Between Edge and Board?
A supplier once told me a primer would solve a stubborn peel issue. I tried it and it worked. Primers can be small fixes with big effects. (PAS)
Primers increase surface energy and remove contamination. They let the glue wet better and form stronger bonds on difficult substrates.
Dive deeper: primer types, when to use them, and how I test effectiveness
Why use a primer?
Primers change the surface chemistry of the board or edge. They act as a bridge between low-energy surfaces and the adhesive. For melamine, laminate, or some polymer backings, a primer often makes the difference between a temporary bond and a durable one.
Types of primers
There are solvent-based primers, water-based primers, and reactive primers designed for specific adhesives. Some manufacturers pack product lines that match their adhesives. Bostik and other suppliers provide primers for porous and non-porous panels. I follow TDS instructions for primer selection and drying time.
How I apply primers
I apply primer in thin, even coats. I follow the manufacturer’s flash-off time. I control ambient temperature and humidity during application. I treat primer like another process step. I document the lot, operator, and drying time.
Testing a primer
I test primer by doing peel tests after full cure. I run samples with and without primer. If primer increases peel strength substantially, I include it in the standard. I also test accelerated aging for humidity and heat. Primer must not cause long-term discoloration or reduce adhesive flexibility.
Using primers adds steps, but it cuts field failures. For low-energy or contaminated surfaces, a primer is a cheap insurance policy compared to rework costs.
The Critical Role of Temperature Control in Achieving Perfect Bonding?
I once ran a job at the wrong pot temperature. The glue did not flow and the edges later lifted. Temperature is that powerful. (PAS)
Temperature controls glue viscosity, open time, and wetting. Consistent glue pot, roller, and board temps make the bond repeatable.
Dive deeper: specific temperatures, equipment settings, and how I monitor them on the line
Key temperatures to control
- Melt pot temperature. This sets the adhesive viscosity. Different adhesives have different melt ranges. EVA melts at lower temps. PUR often needs higher, stable temps. I follow the adhesive TDS. Henkel and others provide target ranges.
- Roller and application temperatures. The melt must reach the application roller at the right temp. If the roller is cold, coating weight drops. If it is too hot, the adhesive may carbonize. I check roller surface temp frequently.
- Substrate temperature. The board and edge surface temperature affects cooling and wetting. I condition boards into a typical shop range (often between 15–30°C depending on recommendations) to avoid thermal shock and poor adhesion. Manuals suggest conditioning between 15–35°C and RH around 40–60%.
Open time and feed speed
Open time (the time the molten glue stays tacky and able to wet) depends on temperature and adhesive type. Higher glue temperature often increases flow but shortens open time by faster cooling in contact. Faster feed speeds require higher coating weights or different glue types. I balance pot temp and line speed to ensure full wetting at assembly.
Monitoring and control
I log temperature readings. I install sensors at the pot, roller, and first nip zone. I set alarms for drift. I train operators to check temperatures during each shift. I also reduce pot temps when line idle to prevent glue degradation. Best-practice guides advise lowering tank temps to avoid carbonizing when idle.
Tight temperature control removes a large source of variability. It also helps meet glue line thickness targets and reduces the chance of visible white lines.
Common Adhesion Failures and How to Prevent Them in Production?
I once had a batch with white glue lines after humidity spike. I then added checks and stopped the problem. (PAS)
Failures like white lines, bubbles, and delamination come from bad wetting, wrong temps, or contamination. I list causes and fixes I use on the line.
Dive deeper: failure modes, root causes, and a clear prevention checklist
Common failure modes and causes
- White lines (delamination near edges): caused by poor wetting, low coating weight, or moisture trapped under adhesive. Fix by increasing coating weight, checking primer, and drying panels.
- Edge peeling: often from low surface energy substrate or incorrect adhesive choice. Use primers or switch to PUR adhesive for better bonding on difficult substrates.
- Bubbles and voids: caused by trapped air, uneven pressure, or rapid cooling. Fix with correct pressure, controlled nip rolls, and consistent feed speed.
- Carbonizing or dark spots: caused by too-high pot/roller temperatures or old adhesive. Lower temps and maintain melt tanks.
Prevention checklist I use
| Issue | Likely cause | Action |
|---|---|---|
| White line | Low coating weight / moisture | Increase coating / dry panels |
| Peel | Low-energy surface / wrong glue | Primer / switch to PUR |
| Bubbles | Air entrapment / uneven pressure | Adjust pressure / slow feed |
| Carbonize | Over-temp / old glue | Lower temp / clean tank |
| Variation mid-run | Temp drift / dirty rollers | Log temps / clean rollers |
I also run in-line peel tests and visual checks every hour. I keep a small sample log for each job. I require suppliers to provide TDS and recommended pot temps. I keep traceability on glue lot numbers and board lot numbers. That traceability helps me isolate root causes fast.
When I apply these steps, my claim rates drop. The line runs smoother. Customers get furniture that lasts.
Conclusion
I control glue lines, primers, and temperatures to make durable edge bonds. That work reduces returns and builds trust.
Data sources and links
- Henkel — TECHNOMELT PUR adhesives for edge banding (product pages and whitepapers). https://www.henkel-adhesives.com. (henkel-adhesives.com)
- Bostik — Primer and sealing technical guides and product datasheets. https://www.bostik.com. (bostik.com)
- Guide to Successful Hot Melt Edge Gluing — practical technical bulletin (industry guide). https://www.timbatechsolutions.com/uploads/2/2/9/8/22981000/guide_to_successful_hot_melt_edge_gluing.pdf. (TimbaTech Pty Ltd)
- ScienceDirect — Study on adhesive type and bond line thickness effects. https://www.sciencedirect.com/science/article/abs/pii/S0143749606000832.
- Best Practices: Hot Melt Edge Banding guide (equipment and temperature notes). https://www.bestingroup.com/hot-melt-edge-banding-the-ultimate-guide/. (bestingroup.com)
- Edge bonding manual — conditioning and environmental ranges. https://plastivar.com/wp-content/uploads/2022/04/edge_bonding_manual.pdf. (Plastivar)